Analytics & privacy
Configure tracking and consent
Choose the storefront tracking mode, connect your consent platform and verify what each choice measures.
Reviewed
On this page
Configure this in PrestaShop → Modules → Module Manager → PrestaOne → Configure → Privacy. The tracking mode controls how storefront visits are measured before analytics consent. The consent-platform mapping tells PrestaOne how to read the visitor's choice.
These are separate settings. Selecting a tracking mode does not install a cookie banner or configure your consent platform for you.
1. Choose a tracking mode
In Storefront tracking & consent, review the three modes and choose the one that matches your store's consent setup and privacy notice.
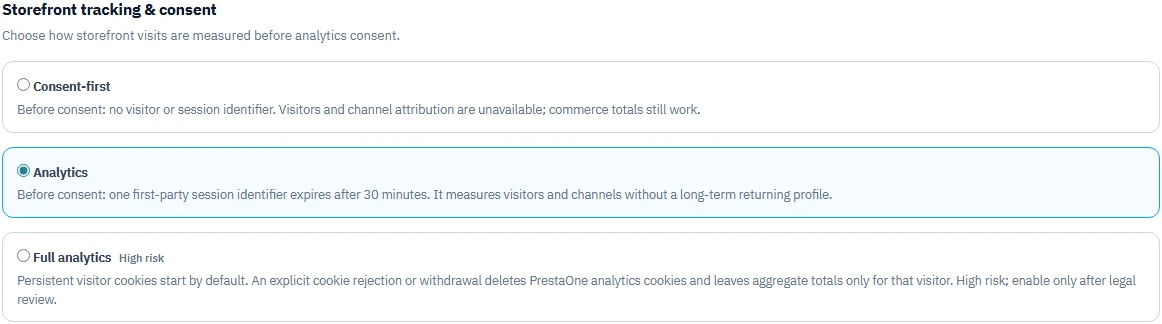 Read the before-consent behaviour before selecting a mode. Changing it affects future measurement. Enlarge ↗
| Mode | Before analytics consent | Effect on reports |
|---|---|---|
| Consent-first | No visitor or session identifier. | Visitors and channel attribution are unavailable for that traffic; commerce totals still work. |
| Analytics | A first-party session identifier expires after 30 minutes. | Measures visits and channels without a long-term returning profile before consent. |
| Full analytics | Persistent visitor cookies start by default. Explicit rejection or withdrawal deletes PrestaOne analytics cookies, leaving aggregate totals only for that visitor. | Broader identification before a choice, subject to later rejection. The module marks this mode High risk and says to enable it only after legal review. |
The module describes product behaviour; a selection is not a certification that your store's privacy configuration is compliant. Have the person responsible for your store's privacy setup choose the appropriate mode. Missing historic tracking cannot be recovered by switching modes later.
2. Try automatic consent detection
- Leave Consent platform mapping on Automatic standards and built-in adapters only when the storefront exposes a supported standard or adapter.
- Click Save privacy settings.
- Open the public storefront in a separate browser session. Load a normal page where the cookie banner and PrestaOne storefront script can run.
- Return to the module's Privacy tab and read the detection result. Detection updates after a storefront visit; opening the Back Office alone does not generate a visitor consent signal.
Automatic integration includes the supported IAB TCF and Google Consent Mode signals and built-in adapters. A result such as Connected automatically should also show the latest analytics consent state: granted, denied or not granted yet.
“Connected” means an integration was recognised. It does not mean this visitor granted consent.
3. Map a proprietary consent entry when required
If the module detects a platform but says setup required, identify the PrestaOne Analytics entry in your consent management platform (CMP). Ask the person who configures that platform for its exact identifier if you do not manage it yourself.
In Privacy → Consent platform mapping, select the platform, choose CMP reference type, enter PrestaOne Analytics reference, and save:
| Platform | Reference to enter |
|---|---|
| Axeptio | The vendor key for the PrestaOne Analytics vendor. |
| Didomi | The PrestaOne custom vendor ID, including its c: prefix where applicable, or a purpose ID that explicitly includes PrestaOne. |
| Usercentrics | The PrestaOne Analytics Data Processing Service ID, preferably; an exact service name is also supported. |
| Klaro | The exact name of the non-required PrestaOne service. |
If References observed on the storefront appears, use it to help identify the correct entry. Still confirm that the entry belongs to PrestaOne. Do not reuse Google Analytics, Meta Pixel or another tool's identifier merely because it is already available.
The platform entry must actually exist in the CMP and be connected to the visitor's choice. Typing a name into the module does not create that service in the banner.
4. Verify acceptance, rejection and withdrawal
Use a separate test browser session so your normal Back Office session and saved consent do not obscure the result. Keep the module's Advanced → Consent diagnostics available.
- Start without an existing consent choice. Visit the storefront and record the mode and reported consent state. Expect the before-consent behaviour described in the table above.
- Grant analytics consent through the storefront banner. Visit another page, then check the latest diagnostic signal. It should identify analytics consent as granted for the test.
- In a fresh test session, reject analytics consent. Visit another page and check the reported denied state.
- In the session where you granted consent, reopen the banner's preferences and withdraw analytics consent. Check that PrestaOne receives the changed state as well.
Diagnostics report the latest observed storefront signal. On a busy store, another visit may replace your test signal; compare the observation time and platform, rather than treating a single “latest” value as a report of all visitors. If needed, have your developer verify the test browser's own storage and network behaviour.
The outcome to look for is a working connection between the visitor's choice and PrestaOne's measured state. A banner that looks correct without changing that state is not a completed integration.
Resolve common detection results
| Result | Next action |
|---|---|
| Checking consent platform… | Visit the storefront first. If it persists, check that both the consent platform and module storefront script load on that page. |
| No consent platform detected | Check that the banner is active on the public storefront. The selected tracking mode still applies; no detected CMP does not mean consent was granted. |
| Platform detected, setup required | Configure the exact PrestaOne service/vendor reference using the mapping steps above. |
| Automatic integration unavailable | Ask the store developer to inspect the platform's supported consent signals. Do not guess a reference for an unrelated service. |
| Multiple consent signals detected | Review duplicate banners or conflicting integrations and verify which one controls analytics. |
| Reports show orders but no visitors | This can be expected with limited consent coverage. Check mode, signal and period using Understand your analytics. |
After changing the banner or its service configuration, repeat the acceptance and rejection checks. Save a note of the mode and change date so future report comparisons have the right context.